
How to Replace or Fix | Air Conditioner Evaporator Coils?

The evaporator coil is the part of your AC system that actually cools the air. Refrigerant flows through it, absorbs heat from inside your home, and sends that cooled air through the ductwork. When the coil fails, you get warm air from the vents, ice forming on the unit, water pooling around the air handler, and energy bills that climb without explanation. Some coil problems are repairable. Others require a full swap. And almost none of them are realistic DIY jobs because of the refrigerant handling involved.
Your fridge is a kitchen superstar as it keeps all your food fresh and drinks cold.
But does the fridge feel warm when you open it?
Is there water all over the floor?
Fridge issues are the worst!
Signs Your Evaporator Coil Needs Attention
Before assuming the coil has failed, rule out the basics. Check the air filter, thermostat settings, and whether any return vents are blocked. If those are fine and you are still experiencing problems, the coil is a strong suspect.
Symptoms that point to a coil issue:
- Warm air from the vents, even though the system runs constantly
- Ice or frost forming on the indoor unit or refrigerant lines
- Hissing sounds near the air handler suggest a refrigerant leak
- Water is pooling around the base of the indoor unit from a frozen coil thawing
- Rising energy bills without any change in usage habits
- Short cycling, where the system starts and stops frequently without reaching the set temperature
Stop troubleshooting and call a technician immediately if you smell refrigerant, if the coil ices over repeatedly after defrosting, or if the breaker trips every time the AC starts.
Repair vs. Replace: How to Decide
A coil repair makes sense when the system is newer, the leak is small and accessible, and the corrosion is limited to one area. A licensed technician can braze a single leak point and recharge the system for a fraction of the replacement cost.
Replacement is the better choice when:
- Multiple leaks are present across the coil surface
- Heavy corrosion has weakened the copper or aluminum tubing
- The system uses R-22 refrigerant, which is no longer manufactured, and costs $50 to $150 per pound to source
- The coil is over 10 years old, and additional failures are likely
- Warranty has expired, and the repair cost approaches 40 to 50% of a new coil
When the outdoor condenser and indoor coil are mismatched in age or refrigerant type, replacing both together improves efficiency and prevents compatibility problems down the road.
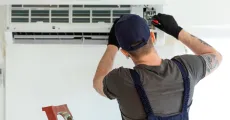
Why This Is a Professional Job
Evaporator coil work involves recovering refrigerant, brazing copper lines, pulling a vacuum on the sealed system, and recharging with a precise amount of refrigerant by weight. Each of these steps requires EPA certification, specialized tools, and training that homeowners do not have.
Task | Why It Requires a Pro |
Refrigerant recovery | Venting refrigerant is illegal under the Clean Air Act. Recovery requires certified equipment |
Brazing and soldering | Copper joints must be brazed with nitrogen purging to prevent oxidation inside the system |
Vacuum and leak testing | A deep vacuum removes moisture and air. Improper evacuation causes compressor failure |
Recharging | Over or undercharging by even a few ounces reduces efficiency and can damage the compressor |
What homeowners can safely do: visual inspection, filter replacement, keeping the area around the air handler clear, and cleaning accessible coil surfaces with a soft brush and approved cleaner.
CLT Appliance Repair handles evaporator coil diagnostics, repair, and replacement across Charlotte with EPA-certified technicians. If your AC is showing coil failure symptoms, our team can pressure test the system, confirm the leak location, and give you a repair vs replace recommendation before any work starts.
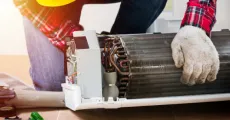
How Evaporator Coil Replacement Works
The full process takes a licensed HVAC technician 3 to 6 hours, depending on accessibility and system type. Here is the sequence at a high level.
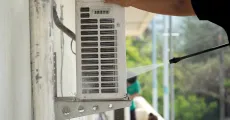
Power-Off & Access
The technician shuts off the breaker, verifies no power is present, and removes the air handler panels to expose the coil compartment. The coil type (A coil, N coil, or slab) is confirmed and matched to the replacement part.
Refrigerant Recovery
All refrigerant is recovered from the system into approved cylinders using certified equipment. Nothing is vented to the atmosphere.
Old Coil Removal
Electrical connections are labeled and disconnected. Copper refrigerant lines are cut or unbrazed from the old coil. Mounting brackets and screws are removed, and the coil is carefully slid out without bending fins or damaging the drain pan.
New Coil Installation
The replacement coil is positioned with the correct airflow direction, secured with mounting hardware, and checked for level and proper drainage slope. The thermal expansion valve or metering device is reconnected or replaced if needed.
Line Connection & Testing
Copper lines are brazed to the new coil with nitrogen flowing through the system to prevent internal contamination. A pressure test with dry nitrogen confirms no leaks at the new joints.
Vacuum, Recharge & Starting
The technician pulls a deep vacuum to remove all air and moisture, then recharges the system with the correct refrigerant type and amount by weight. Power is restored, the system starts, and superheat, subcooling, and operating pressures are verified against manufacturer specs.
Reassembly
All gaps around the air handler are sealed with foil tape or mastic to prevent air leaks. Access panels go back on and are secured.
Fixing Minor Coil Issues Without Full Replacement
Dirty coils that have not failed structurally can often be cleaned to restore performance. A coil coated in dust and grime acts like insulation, reducing heat transfer and forcing the system to work harder. Approved no-rinse coil cleaners and a soft brush can handle mild buildup on accessible surfaces.
For small, accessible leaks, a technician can braze the leak point and recharge. This buys time but does not guarantee the coil will not develop additional leaks, especially if corrosion is the underlying cause. Epoxy sealant kits sold at hardware stores are temporary at best and often fail under operating pressure within months.
If you are patching the same coil for the second time, plan for a full replacement.
Keeping Your New Coil Fit
Preventive maintenance extends coil life significantly:
- Change the air filter every 1 to 3 months, depending on usage and household dust levels
- Keep return vents clear, so airflow across the coil stays consistent
- Schedule annual professional maintenance that includes coil cleaning, drain line inspection, and early corrosion checks
- Maintain proper refrigerant charge since a low charge causes the coil to freeze, and a high charge causes it to overheat

Takeaway
Evaporator coil problems show clear symptoms, and the repair vs replace decision comes down to leak severity, system age, and refrigerant type. The actual replacement is a professional job from start to finish because of the refrigerant handling, brazing, and system recharging involved. What homeowners can control is catching symptoms early and maintaining the coil through regular filter changes and annual service.
We replace and repair evaporator coils across Charlotte at CLT Appliance Repair. Our HVAC technicians are EPA certified, carry the diagnostic equipment to pressure test on site, and give a clear recommendation before touching anything. If the coil needs a braze or a full swap, the job gets scoped honestly and completed in one visit whenever parts are available.
Don't let a malfunctioning Air conditioner disrupt your daily life. Contact CLT Appliance Repair today at 704-606-9043 to schedule your Air conditioner repair service.
We'll have your fridge back to optimal performance in no time!
FAQs
A coil can sometimes be repaired if there is only a small, accessible leak. Coils with multiple leaks, heavy corrosion, or extensive damage usually need full replacement for a reliable fix.
Replacing an evaporator coil is not a realistic DIY job because it requires refrigerant recovery, brazing, vacuuming, and precise recharging that legally and safely must be done by a licensed HVAC technician.
Repair the coil if the system is relatively new and under warranty. If the unit is older, uses outdated refrigerant, or the repair cost approaches a large share of full system replacement, replacing the entire system is usually smarter.
Appliance Repair Indian Land SC | Appliance Repair Indian Trail NC | Appliance Repair Pineville NC | Appliance Repair Rock Hill SC | Appliance Repair Belmont NC | Appliance Repair Matthews NC | Appliance Repair Lancaster SC | Appliance Repair Cornelius NC | Appliance Repair Fort Mill SC | Appliance Repair Concord NC | Appliance Repair Denver NC | Appliance Repair Monroe NC | Appliance Repair Mooresville NC | Appliance Repair Harrisburg NC | Appliance Repair Lake Wylie SC | Appliance Repair Huntersville NC | Appliance Repair Kannapolis NC | Appliance Repair Mint Hill NC | Appliance Repair Waxhaw NC | Appliance Repair Troutman NC | Appliance Repair Davidson NC | Appliance Repair Gastonia NC | Appliance Repair Charlotte NC